Jul 31, 2016

Scented Death Star

My wife collects scented candles.  She doesn't actually use them; they just sit in my closet until I purge the house occasionally.  I had no expectation of this pattern changing, until recently, when I tried to think of a gift for my friend's 5-year old son.
On learning the boy's recent infatuation with Star Wars toys and noticing that the Death Star is missing from his collection, I looked for a decent scale model of the Death Star--preferably the half-constructed (but "fully operational")  The Return of the Jedi version as shown above--but I was shocked at the lameness of what I found on eBay.  The best looking model to be had for < $20 was just a rubber mold for a Death Star ice sphere (for Whiskey on Rocks Death Star as shown below), and I gave up the search.
A few days later, while reading the USB Complete, 4th Edition, I had an epiphany: why not melt the candles into the mold--and "kill 2 birds with 1 stone": get rid of my wife's stash of scented candles AND get a Death Star toy?  So I ordered the above "ice cube tray" from eBay, and waited a few weeks.  I don't understand how our Chinese brothers can make money selling something for like $3 including international shipping; but I wish we could on-shore value manufacturing for something like this back to the US.

Here's the 1st look at the mold on arrival.
The hemi-spheres are keyed, and the detail for the laser cannon firing dimple--the most important part of the model--seems acceptable.  Next, I grabbed one of the candles: Christmas Cookie scent--whatever--and melted it in a saucer pan filled with water, to separate the candle from the glass container.
After about 2 minutes, I could grab the wick to pull out the candle from the glass.
Then I cut out the candle into a roughly spherical shape, like so.
I closed up the mold, and small make-shift funnel on the pour hole indicated above.
I put the candle pieces and shavings back into the glass and reheated it in the saucer pan shown above, and then poured the melted wax into the funnel above, until the funnel overflowed.
It's a bit messy, but the wax comes off the surface with a utility knife.  To help wax better fill the nooks and crannies, I covered the pour hole, and tap it on the desk VIGOROUSLY while the wax is still in liquid state).  After 1 hour, open the mold.
There are few surface blemishes (hence the emphasis on vigorously for you), but a pretty good return for a $3 investment!

But I know are you thinking: "where's the laser cannon--the one that can destroy a planet in 1 shot?"

The laser cannon

I agree: a Death Star without the laser cannon is like fish & chips without the chips.  Fortunately, our Chinese manufacturers came through again: 5 mW laser pointer for $2 on eBay (batteries NOT included).
Do NOT shine the 5 mW laser pointer directly into the eye!
It's OD (outside diameter) is about 9/16", but the laser beam's width is only about 1/8".  I want to "fire" the laser from within the wax to diffract the laser beam, so I will use 2 different drill bits.

From the other end of the Death Star relative to the dimple, drill a hole wide enough to accommodate the laser pointer, but do NOT drill through (i.e. leave the dimple intact).  Now drill a 1/8" hole in the middle of the dimple, to let the laser light escape.

The Master Card moment

Insert the laser pointer into the larger hole, and shine THROUGH the 1/8" hole.  $3 for the mold, $2 for the laser pointer, $x for scented candle my wife got as a gift from someone.  The Death Star shining in your hand: priceless.  The laser beam actually lighting up a screen is extra credit.

If your Death Star looks cooler than this, please share a picture and your method.

Jul 17, 2016

USB HID on STM32F042

For most of my career, I've worked only on super expensive products; frankly I am tired of it.  Recently, I switched the industry and learned a lot about wireless/wearable consumer electronics at Jawbone.  I've been looking for a cheap USB-capable (phone to the uC) uC for a recently started hobby project, and decided to try the STM32L0 or STM32F0 line.  STM32L052xx have 64/32 KB flash and 8 KB SRAM, and available in 32-pin QFN package.  But STM32F042xx is even smaller, at 32/16 KB flash, 6 KB SRAM, and down to 20-pin (TSSOP) package.  I bought both the nucleo-l053r8 eval board and the nucleo-f042k6 eval board--rounding out my STM32 eval board collection (I now have an eval board for the STM32 L0, L1, L4, F0, F4, and F7 lines.  See my previous entries on running Linux on the STM32F4, and running the UBoot on STM32F7).

Update: after nearly 2 years of sitting on the problem, I found out why the device was not enumerating: it does enumerate if you run the release code (vs. debug).  But I still don't know the root cause.

Blinking the nucleo-32 user LED

Where ultra-low power consumption is not an overriding criteria, the F0 line is the more consumer/toy friendly option, so I begin my experiments with the nucleo-f042 board.
The big 3-color LED package right next to the micro-USB connector (at the top of the above picture) is the ST-Link indicator and is not accessible from the uC.  Of the 2 LEDs on the bottom of the above picture, the green LED (on the right) is the LD3 that the uC can control on the PB3 pin (pin D12 on the nucleo32 board), as you can see in the hardware block diagram.
To blink this LED from my GNU ARM Eclipse CDT environment (I could use the Keil uVision since the flash is only 32 KB--the max size supported by the free license of the Keil uVision--but I am more familiar with the Eclipse CDT environment), I created a new C project using the GNUARMEclipse plugin's STM32F0xx C/C++ project template, as shown below.
In the next screen, I chose the STM32F042 chip family, and the correct flash and RAM size (32 and 6, respectively).  The clock nominally an external clock source speed, but in this case it confusing, since this board does NOT have an external OSC, as you can see in the above block diagram.  Since I plan to use the 8 MHz internal (on-chip) RC clock source (multiplied 6x to 48 MHz) as you can see below, I entered 8000000 for the "Clock (Hz)" textbox.
Of the remaining options, I whack the "Use newlib nano", to make the most of the code space.

To debug the project from Eclipse through OpenOCD (you have to download/compile OpenOCD itself, since the Eclipse OpenOCD plugin does not seem to come with the executable itself), a few setups are required.  The Eclipse wide setup is available in Preferences --> Run/Debug --> OpenOCD.  Currently, it consists of just the executable name and path.  The debug configuration option for the project also needs to be told which OpenOCD config file to use for the board, as shown below.
After all this, the "blink" project does not blink at first, because the pin assignment is incorrect for the board.  In the auto-generated BlinkLed.h, I changed the port and pin to PB3, as you can see below.

// Port numbers: 0=A, 1=B, 2=C, 3=D, 4=E, 5=F, 6=G, ...
#define BLINK_PORT_NUMBER               (1)
#define BLINK_PIN_NUMBER                (3)


With the green LED now blinking away, I proceed convert this FW into a USB HID device.

Generating USB HID FW code in STM32CubeMx

The CubeMX GUI can assign pin functions and generate code stub for USB.  To get going, I just need to enable the USB FS 2.0 in the Pinout explorer.  I also want to test USB remote wakeup from a button, so I assigned PA0 to EXTI0, as you can see in the pinout view:
During development, a testpoint I can watch on the scope is super-helpful, so I assigned PA1 to GPIO output.  And I think the SWD semi-hosting is too slow, so I instead use UART2 to drive out SW tracing messages.  At 8 sample/bit oversampling, I can drive out 6 Mbaud from this peripheral, but my FT232R USB to serial translator chip can only go up to 3 Mbit/s anyway, so I constrain the peripheral to 3 Mbps, as shown below.
If you want to transmit an uint8_t type as a trace, you have to increase the word length to 8 bits (not counting parity).  If using the nucleo boards, the ST-Link VCOM port, using its VCOM port which shows up to the development Windows PC as a COMx device is a cleaner alternative--although I am not sure what maximum baud rate it supports.
I then generate a code through menu --> Project --> Generate code.  I have to copy (and replace if necessary; you can actually just create softlinks) some of these files to the blinky project I just ran in the last section, by dragging and dropping the items into the Eclipse project explorer.
  • Inc/* --> include/
  • Src/* --> src/.  Delete the existing Timer.c and Blink.c, since we will not be blinking the LED any more.
  • Drivers/STM32F0xx_HAL_Driver/Inc/* (including the Legacy/ folder) --> system/include/stm32f0-stdperiph/.  Note that the HAL headers have "_hal_" in the name.
  • Drivers/STM32F0xx_HAL_Driver/Src/* --> system/src/stm32f0-stdperiph/.  Delete the existing source files (those without "_hal_" in the name) since they are unnecessary now.
  • Drivers/CMSIS/Device/ST/STM32F0xx/Include/*.h --> system/include/cmsis/
  • Drivers\CMSIS\Device\ST\STM32F0xx\Source\Templates\system_stm32f0xx.c --> system/src/cmsis/
  • Drivers\CMSIS\Device\ST\STM32F0xx\Source\Templates\gcc\startup_stm32f042x6.s --> system/src/cmsis/startup_stm32f042x6.S.  The extension change from ".s" to ".S" is required because Eclipse CDT expects assembly file extension to be ".S".
  • Middlewares/ST/STM32_USB_Device_Library/Core/Inc/* --> include/
  • Middlewares/ST/STM32_USB_Device_Library/Core/Src/* --> src/
  • Middlewares/ST/STM32_USB_Device_Library/Class/CustomHID/Inc/* --> include/
  • Middlewares/ST/STM32_USB_Device_Library/Class/CustomHID/Src/* --> src/
The USB middleware files are necessary only because I want to use the ST's USB middleware.  Initially, I tried to copy the folder Middlewares/ST/STM32_USB_Device_Library/ to the project root, but the GNUARMeclipse project template would not generate a recursive build rule for the STM32_USB_Device_Library folder I copied.  Figuring I will switch to a Makefile in the end, I just worked around by copying the sources individually to existing include/ and src/ folders.

The CPP requires the chip definition, so I added a new symbol "STM32F042x6" to  project properties --> C/C++ Build --> Settings --> Cross ARM C Compiler --> Preprocessor to ALL build configurations (Debug and Release).  With this change, the project builds again, and I can run the FW from the debugger.  But since I did not solder on USB connections, nothing interesting happens.  Soldering on a USB connector itself is easy enough; the most time consuming part are figuring out the D+/D- pins (3 and 2, which are in the middle of the USB standard type A connector; pin 1 is the Vbus, on the right hand side of the connector when you look straight at the cable) and shielding the D+/D- cables, for anything but the low speed USB devices.
I connected the D- cable to PA11 (nucleo board CN3.14) and the D+ cable to PA12 (CN3.5).  The Vbus cable is left unconnected until I will need to power the prototype from the Vbus.  Now I should be able to connect this FW to a host PC, but before I dive into the USB HID, let me insert SW tracing library into the project--because I expect things to NOT work the first time.

Marrying QPN with the STM32 HAL

The 32 KB flash and 6 KB SRAM leaves no room for high level SW such as an OS or a standard lib.  QPN is ideal for a moderately complex "multi-tasking" FW.  QPN has already been ported to CM0+ (on nucleo-l053r8), so let's start with a working example: $(QPN)/examples/arm-cm/dpp_nucleo-l053r8.  The example links against the nucleo-l053r8 board support files (I guess originally copied from the ST peripheral lib), but I am now generating all necessary files from the CubeMX, so I will just pick up the chip/board support from there.

I could not get CubeMX to change the code output folder (seems to be a bug), so I am living with the default output folder set when I created the CubeMX project.  I am going to build the project with a slightly modified version of the QPN DPP example Makefile.  The source and include paths should mirror the folders from which I copied manually in the first section above.

DRIVE := D:

QPN := $(DRIVE)/QP/qpn
# QP port used in this project
QP_PORT_DIR := $(QPN)/ports/arm-cm/qv/gnu


# I use CubeMX to generate the HAL and middleware files
CUBEMX_OUT := $(DRIVE)/uC/ST/play/nucleo-l042-hid
DEVICE := STM32F042x6
DEVICE_FAMILY := STM32F0xx
#Could not get this to work: DEVICE_FAMILY = $($(DEVICE):x%=xx)
HAL := $(CUBEMX_OUT)/Drivers/$(DEVICE_FAMILY)_HAL_Driver
CMSIS := $(CUBEMX_OUT)/Drivers/CMSIS


# list of all source directories used by this project
VPATH = $(QPN)/source $(QP_PORT_DIR) \
 $(CUBEMX_OUT)/Src $(HAL)/Src \
 $(CMSIS)/Device/ST/$(DEVICE_FAMILY)/Source/Templates \
 $(CUBEMX_OUT)/Middlewares/ST/STM32_USB_Device_Library/Core/Src \
 $(CUBEMX_OUT)/Middlewares/ST/STM32_USB_Device_Library/Class/CustomHID/Src


# list of all include directories needed by this project
INCLUDES  = -I. \
 -I$(QPN)/include -I$(QPN)/source -I$(QP_PORT_DIR) \
 -I$(CUBEMX_OUT)/Inc -I$(HAL)/Inc \
 -I$(CMSIS)/Include -I$(CMSIS)/Device/ST/$(DEVICE_FAMILY)/Include \
 -I$(CUBEMX_OUT)/Middlewares/ST/STM32_USB_Device_Library/Core/Inc \
 -I$(CUBEMX_OUT)/Middlewares/ST/STM32_USB_Device_Library/Class/CustomHID/Inc


C_SRCS := startup_stm32f042x6.c system_stm32f0xx.c \
 bsp.c main.c philo.c table.c \
 cubemx_main.c  stm32f0xx_it.c  usbd_conf.c  usbd_desc.c \
 usbd_core.c  usbd_ctlreq.c  usbd_ioreq.c \
 stm32f0xx_hal_msp.c  usb_device.c  usbd_custom_hid_if.c \
 usbd_customhid.c \
 stm32f0xx_hal.c stm32f0xx_hal_pcd.c stm32f0xx_hal_rtc.c \
 stm32f0xx_hal_cortex.c stm32f0xx_hal_pcd_ex.c stm32f0xx_hal_rtc_ex.c \
 stm32f0xx_hal_dma.c stm32f0xx_hal_pwr.c stm32f0xx_hal_tim.c \
 stm32f0xx_hal_flash.c stm32f0xx_hal_pwr_ex.c stm32f0xx_hal_tim_ex.c \
 stm32f0xx_hal_flash_ex.c  stm32f0xx_hal_rcc.c  stm32f0xx_hal_uart.c \
 stm32f0xx_hal_gpio.c  stm32f0xx_hal_rcc_ex.c  stm32f0xx_hal_uart_ex.c
 

QPN normally wants full control of the uC--running its tick update in the Systick_Handler, and handling the button press by directly checking the GPIO register.  But since I am trying to assess the benefit of the STM32 HAL, I changed the QPN bsp.c to use the HAL.

void HAL_SYSTICK_Callback(void) //HAL will call me back from Systick_Handler
{
    QF_tickXISR(0U); /* process time events for rate 0 */
}


void BSP_init(void) {
    BSP_randomSeed(1234U); /* seed the random number generator */
}


void BSP_displayPhilStat(uint8_t n, char const *stat) {
    if (stat[0] == 'h')
     HAL_GPIO_WritePin(GPIOA, GPIO_PIN_3, GPIO_PIN_SET);
    else
     HAL_GPIO_WritePin(GPIOA, GPIO_PIN_3, GPIO_PIN_RESET);
}


void QF_onStartup(void) {
    //CubeMX generates main(), which initializes every peripheral I configure
    //in CubeMX, but spins in a while loop.  I just rename the function and
    //delete the while(1) loop.
    extern void cubemx_main(); cubemx_main();
}


With these changes, the project builds cleanly, and generates the waveform for the philo[0] being hungry.
According to arm-none-eabi-size report, QPN and the DPP (dining philosopher) state machine application added less than 2 KB to the image size!

QP for QPN

QPN achieves its small footprint partly by leaving out
It does NOT support the QS tracing feature found in QPC, but I've ported it to run with QPN before, so I'll reuse my previous work here.  When using QS with QPN, the trickiest part is not colliding with the qpn header file.  I wrote the qs_port.h this way:

#define QS_TIME_SIZE     4
#define QS_OBJ_PTR_SIZE  4
#define QS_FUN_PTR_SIZE  4
#define Q_SIGNAL_SIZE 1
#define QF_EVENT_SIZ_SIZE 1


#ifndef QF_CRIT_ENTRY
#define QF_CRIT_ENTRY(dummy) QF_INT_DISABLE()
#endif
#ifndef QF_CRIT_EXIT
#define QF_CRIT_EXIT(dummy)  QF_INT_ENABLE()
#endif


#include <stdint.h>
#include "qpn.h"
typedef char char_t;
#include "qs.h"      /* QS platform-independent public interface */

Do NOT flush in QS_xxx_dict() function

There is a rather convoluted circular dependency between QS, QPN, and the ST HAL: normally, QS flushes the circular buffer after each dictionary item declaration.  Flushing requires the hardware setup, which happens in BSP_init(), which in this port relies on running the (modified) main() generated by CubeMx.  But the generated code enables the interrupts right away, so the Systick interrupt will trip in 1 ms (because the STM32 HAL hard-codes frequency to 1000 Hz) from roughly when I call BSP_init() in application main.  So if I put the flushing version of the QS dictionary declarations AFTER the HAL main(), there is a danger that the state machine initializations (happens inside QF_run) might not have completed by the time the Systick interrupt fires.  In a bare-metal ports of QPN, the interrupts enable is delayed until the state machines are initialized (in the QF_onStartup callback).  Since I want to leave the generated ST HAL code alone, I worked around this circular dependency by commenting out the flush at the end of the dictionary item declarations.

Now I am ready to instrument the CubeMX generated USB custom HID code.

STM32CubeMx generated custom HID stack

The USB processing seems to happen entire in the USB peripheral interrupt.

USB_IRQHandler(void)
--> HAL_PCD_IRQHandler(PCD_HandleTypeDef *hpcd)
    --> HAL_StatusTypeDef PCD_EP_ISR_Handler(PCD_HandleTypeDef *hpcd)
        --> HAL_PCD_DataOutStageCallback(PCD_HandleTypeDef *hpcd
                                       , uint8_t epnum)
            --> USBD_StatusTypeDef USBD_LL_DataOutStage(
                        USBD_HandleTypeDef *pdev, uint8_t epnum
                      , uint8_t *pdata)
                --> USBD_CUSTOM_HID.DataOut()
                    --> USBD_CUSTOM_HID_DataOut()
                        --> ((USBD_CUSTOM_HID_ItfTypeDef *)pdev->pUserData)
                                ->OutEvent(hhid->Report_buf[0]
                                         , hhid->Report_buf[1]);

The OutEvent function pointer is defined an also auto-generated interface:

typedef struct _USBD_CUSTOM_HID_Itf
{
  uint8_t                  *pReport;
  int8_t (* Init)          (void);
  int8_t (* DeInit)        (void);
  int8_t (* OutEvent)      (uint8_t, uint8_t );  

}USBD_CUSTOM_HID_ItfTypeDef;

The CubeMX generated OutEvent() does NOT do anything, as you can see here:

static int8_t CUSTOM_HID_OutEvent_FS  (uint8_t event_idx, uint8_t state)
{
  /* USER CODE BEGIN 6 */
  return (0);
  /* USER CODE END 6 */
}


The event_idx and state are merely the 1st 2 bytes of the HID report buffer, as you can see in how the lower level of the USB stack calls the OutEvent:

static uint8_t  USBD_CUSTOM_HID_DataOut (USBD_HandleTypeDef *pdev,
                              uint8_t epnum) {
  USBD_CUSTOM_HID_HandleTypeDef     *hhid = (USBD_CUSTOM_HID_HandleTypeDef*)pdev->pClassData; 
 
  ((USBD_CUSTOM_HID_ItfTypeDef *)pdev->pUserData)->OutEvent(

            hhid->Report_buf[0], hhid->Report_buf[1]);
   
  USBD_LL_PrepareReceive(pdev, CUSTOM_HID_EPOUT_ADDR , hhid->Report_buf,
                         USBD_CUSTOMHID_OUTREPORT_BUF_SIZE);

...

As it turns out, the Report_buf in the custom HID example is hard coded to only 2 bytes long in usbd_conf.h--short enough that I will overlook copying out the bytes from the USB register to the Report_buf  a byte at a time:

/*---------- -----------*/
#define USBD_MAX_NUM_INTERFACES     1
/*---------- -----------*/
#define USBD_MAX_NUM_CONFIGURATION     1
/*---------- -----------*/
#define USBD_MAX_STR_DESC_SIZ     512
/*---------- -----------*/
#define USBD_SUPPORT_USER_STRING     1
/*---------- -----------*/
#define USBD_DEBUG_LEVEL     0
/*---------- -----------*/
#define USBD_SELF_POWERED     1 // TODO change
/*---------- -----------*/
#define USBD_CUSTOMHID_OUTREPORT_BUF_SIZE     2
/*---------- -----------*/
#define USBD_CUSTOM_HID_REPORT_DESC_SIZE     2
/****************************************/
/* #define for FS and HS identification */
#define
DEVICE_FS   0

* This device IS a FS device, so DEVICE_FS should be 1 above, but it does not seem to be used anyway.

At first glance, calling USBD_LL_PrepareReceive() AFTER the application has processed the Rerpot_buf seemed strange--until I saw the 1st invocation of USBD_LL_PrepareReceive() in USBD_CUSTOM_HID_Init(); PrepareReceive resets the EP's RX state, for asynchronous reception to happen in the future.

I also noticed that InEvent is missing in the interface, so USBD_CUSTOM_HID_DataOut() just returns without doing anything.  Clearly, if I want to an IN endpoint, I cannot use the auto-generated file verbatim.  But for now, let's put in some trace points into the generated code and watch the USB enumeration process.  To measure the interrupt latency through HAL, I assert the test point in the ISRs themselves (which are supplied in the stm32f0xx_it.c).  Auto-generated codes have designated user-code snippet areas that are preserved on code regeneration.  These are the places to put my testpoint codes:

/* USER CODE BEGIN 0 */
#include "bsp.h"
/* USER CODE END 0 */

...

void SysTick_Handler(void)
{
  /* USER CODE BEGIN SysTick_IRQn 0 */
  INT_TP(1);//measure on scope
  /* USER CODE END SysTick_IRQn 0 */

...

void USB_IRQHandler(void)
{
  /* USER CODE BEGIN USB_IRQn 0 */
  INT_TP(1);//measure on scope
  /* USER CODE END USB_IRQn 0 */

...

I will now sniff the USB packets in the Saleae Logic analyzer, with a copy of USB Complete, 4th Edition on one hand.  The book dedicates 3 separate CHAPTERS on HID, indicating how widely used the HID devices are.  Of particular importance is the HID report descriptor, which in this example is hard coded in usbd_custom_hid_if.c CUSTOM_HID_ReportDesc_FS:

__ALIGN_BEGIN static uint8_t CUSTOM_HID_ReportDesc_FS[USBD_CUSTOM_HID_REPORT_DESC_SIZE] __ALIGN_END =
{
  /* USER CODE BEGIN 0 */
  0x00,
  /* USER CODE END 0 */
  0xC0    /*     END_COLLECTION              */  
};


Reading about the END_COLLECTION tag, I realize that the above HID report never BEGAN a collection (application collection, to be specific, because all report items must be in an application collection--which begs the question of what the OTHER main item tags in a collection are for) with 0xA1, as demonstrated in USB Complete, 4th Edition Listing 11-2 of an HID descriptor.  Since this descriptor is technically not well-formed, I am not sure if the host application can actually use this custom HID device, and I enumeration seems to be failing on Windows as you can see in this screenshot of msinfo32:
I posted the question to ST forum, but meanwhile, let me try to work around this.

Switching to STM32F042F6P6

Just as I was about to attach the logic analyzer to the D+/D- pins of the STM32F042K6, the nucleo board suddenly stopped responding to the SWD.  I even tried to bypass the nucleo board's ST-Link and connect to the uC with an external ST-Link or J-Link, but the uC just would not respond.  Since I planned to migrate to the more production-like setup at some point, I ordered the smaller chip and an Aries TSSOP-20 adapter board from mouser, which lets me get at all 20 pins of the chip, as shown below.
In the above picture, I connect straight to the SWD pins from the Segger J-Link (SWD CLK and IO pins are pins 9 and 7 in the 20-pin JTAG connector on the J-Link), and I supply 3V from an external power supply.  But I later learned that it would be easier to buy a complete eval board that includes an LDO, and you always have to pay respects to people who not only create their own dev board, but also explain the design considerations.
Since I have a new uC, I created another CubeMX project for the new uC--and ran into another problem: CubeMX thinks STM32F042F6 does NOT have a USB and grays out the USB peripheral, as you can see below.
On looking at the CubeMX mcu template for the STM32F042Px, I found that the USB data lines are assigned only to PA11/12--which is distinctly missing in the above picture.  And the datasheet confirms that the USB pins are on PA11/12.  So I changed the PA9/10 pin assignment to PA11/12 in the SYS config, as you can see below, and magically, the USB peripheral becomes available again.
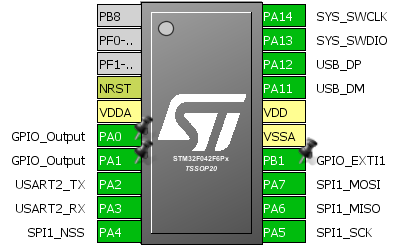
The existing project still builds fine for the new chip, because the device class (STM32F042x6) remains the same.  If I still use the UART2 for SW tracing and 2 GPIO for test points, I wind up using almost all available pins, as you can see below.
Note that I still want to leave the PB8 for the DFU (device firmware upgrade) feature--which I will explore later.  PF0/1 can potentially be used for additional GPIO since I do not use external oscillator (watch the BOM!).  I will write the code to handle the button press with PB1 GPIO_EXTI handler later.

Sniffing the USB HID enumeration in Logic Analyzer

Since I did not yet modify the CubeMX generated custom USB HID source--which includes the USB device description table in Src/usb_desc.c or the custom HID configuration descriptor in the usbd_custom_hid_if.c, this FW should enumerate without a problem as  VID=0x0483 and PID=0x5750, as hard coded in the beginning of the usbd_desc.c:

#define USBD_VID     1155
#define USBD_LANGID_STRING     1033
#define USBD_MANUFACTURER_STRING     "STMicroelectronics"
#define USBD_PID_FS     22352
#define USBD_PRODUCT_STRING_FS     "STM32 Custom Human interface"
#define USBD_SERIALNUMBER_STRING_FS     "00000000001A"
#define USBD_CONFIGURATION_STRING_FS     "Custom HID Config"
#define USBD_INTERFACE_STRING_FS     "Custom HID Interface"


These strings are arranged in an array that is later indexed by both the device and the host.

USBD_DescriptorsTypeDef FS_Desc =
{
  USBD_FS_DeviceDescriptor,
  USBD_FS_LangIDStrDescriptor,
  USBD_FS_ManufacturerStrDescriptor,
  USBD_FS_ProductStrDescriptor,
  USBD_FS_SerialStrDescriptor,
  USBD_FS_ConfigStrDescriptor,
  USBD_FS_InterfaceStrDescriptor,
};


When I connect the USB D+/D- pins to an old USB cable I sacrificed for the purpose and connect the "host" end (type A connector) to my laptop (burning out a USB 2.0 port in the trial-and-error stage; note to self for the future: ALWAYS use a cheapo hub to dork around with USB device!!), it tries to enumerate, as you can see in the properties discovered by the USBDeview program I downloaded to inspect all USB devices.
But I am curious what happened during enumeration, so in this section I will match up the Logic Analyzer's trace against my copy of USB Complete, 4th Edition.  You might want to skip to the next section if you don't care about how I teach myself the USB HID protocol.

I see the following packets on the wire:
  1. Reset: 11 ms (> 10 ms required by the 2.0 spec) of D+/D- both pulled low.
  2. 10 empty packets
    1. SYNC
    2. 8-bit PID.  PID[0:3] = ~PID[4:7] for error checking.  The 1st PID is SOF, which is followed by a 11-bit frame number (for FS).  Note that the first frame number is random.
    3. CRC OK.  CRC is 16-bit for data, and 5-bit for address and EP
    4. EOP: for FS, EP is D+ and D- both 0 for 2 bit widths.
  3. SETUP packet.  Address = 0, endpoint = 0.  This is the step 8 in USB Complete, 4th Edition, Enumeration chapter.  8th byte of the device descriptor contains the maximum packet size supported by the EP0
  4. DATA0
    1. Direction: device -> host
    2. Type: Standard
    3. Recipient = Device
    4. bRequest = 6 (GET_DESCRIPTOR)
    5. wIndex = 0
    6. wLength (11 bits) = 64
    7. Data CRC (16-bits)
  5. DATA1 (device --> host?).  The following information was hard coded in USBD_FS_DeviceDesc
    1. bLength=18
    2. bDescriptorType=1 (DEVICE)
    3. bcdUSB = 0x200 (2.00)
    4. bDeviceClass = 0 (deferred to interface descriptors)
    5. bDeviceSubClass = 0
    6. bDeviceProtocol = 0
    7. bMaxPacketSize0 = 64.  Windows host requests 64 bytes but after receveiving just one packet
    8. idVendor = 1155 (assigned to STM)
    9. idProduct = 22352
    10. bcdDevice = 0x200 (2.00)
    11. iManufacturer = 1.
    12. iProduct = 2
    13. iSerialNumber = 3
    14. bNumConfiguration = 1
  6. ACK
  7. IN, addr = 0, EP = 0
    1. device NACKs this IN
    2. Approximately 62 us later, host retries.
    3. Device replies back with the same data as in DATA1 in step 5 above.
  8. OUT, addr = 0, EP = 0.  There should be a data that follows an OUT packet, but the only data I see is an empty DATA1, followed by an ACK from the device.  Maybe this is just how the host and the device exchange ACK after an IN transaction?
  9. The hub resets the device.  Reset lasted 11 ms.
  10. 16 SOFs, with 1 ms interval go unanswered.
  11. SETUP A=0, E=0
    1. Followed by DATA0 (requestType = 0, Request=5, SET_ADDRESS=4)
    2. And then an ACK
  12. It's bizarre why the host would follow up immediately with an IN packet for A=0, E=0, and 10 more SOFs go by.  Maybe this is the "step 7 in the enumeration chapter of the USB Complete.
  13. Another SETUP, this time A=4, E=0, followed by DATA = GET_DESCRIPTOR (wLength = 18).
    1. The device responds with the same information as in step 5 above.
  14. Host sends another GET_DESCRIPTOR, but this time for CONFIGURATION[0].
  15. Host fires IN request, which the device NAKs.  Host retries after 45 us, and this time, the device returns the information hard coded in the auto-generated usbd_customhid.c USBD_CUSTOM_HID_CfgDesc:
    1. the max power for  the configuration = 100 mA
    2. Descriptor type = 0x04 (interface), interface number = 0, alternate setting = 0, interface class = 3 (HID), subclass = 0 (none), protocol = 0, iInterface = 0, bLength=9
    3. DescriptorType = 0x21 (HID).   HID version = 0x0111 (1.11), country = not supported, bNumDescriptor = 1, HID report descriptor.
    4. 1 IN interrupt report, and 1 OUT interrupt report. wMaxPacketsize = 2 bytes (I don't know why we use different defines than the USBD_CUSTOM_HID_REPORT_DESC_SIZE seen earlier; keeping track of yet another 2 defines CUSTOM_HID_EPOUT_SIZE and CUSTOM_HID_EPIN_SIZE just seems like a chore).  Polling interval both 20 ms.
  16. OUT (A=4, EP=0), empty DATA
  17. SETUP, GET_DESCRIPTOR for STRING descriptor, index 3, language = English
  18. IN: answered by NAK
  19. 80 us later, SOF, IN, with DATA this time, for the string descriptor at index (3+1) in the FS_Desc string array shown above.
  20. Why this is followed immediately by an unnecessary OUT with empty DATA, I don't understand.
  21. SETUP/GET_DESCRIPTOR for the string at string array index 0.  This is answered with IN, wLANGID=1033, which is at array index 1:SETUP/GET_DESCRIPTOR for string array index 2, wIndex=1033 (language = English).
  22. SETUP/GET_DESCRIPTOR for string index 2, which is answered by the string at the array index 3 above (product)
  23. SETUP-GET_DESCRIPTOR for DEVICE_QUALIFIER[0], which is answered by a STALL, which means the device does not support this request.
  24. After 16 empty SOF/ACK exchange, the host seems to recover, and sends SETUP-GET_DESCRIPTOR for DEVICE[0].  The device answers with the same information as in step 5 above.
  25. SETUP-GET_DESCRIPTOR for CONFIURATION[0].  As with all other GET_DESCRIPTOR, the host initiates IN transaction almost right away (14 us), and the device NAKs the first IN.  The content of the CONFIGURATION[0] is the same as in step 14 above.
  26. CONFIGURATION[0] IN transaction is repeated AGAIN right away--why??
  27. SETUP-SET_CONFIGURATION(0), which the device ACKs right away.  Note that this device only has 1 configuration
  28. IN is NAKed, and then answered with an empty DATA
  29. SETUP-HID SET_IDLE(duration = indefinite, report ID = 0).  This is to save BW by limiting the reporting frequency of an interrupt IN EP when the data hasn't changed since the last report.
  30. IN-empty data
  31. SETUP-GET_DESCRIPTOR[0] is answered by "Unknown main item (0); end collection".  The report descriptor is hard-coded in CUSTOM_HID_ReportDesc_FS discussed earlier.
Maybe the "end collection" tells the Windows host that there is no more to be learned, so it can loads the device driver.  But an ill-formed HID report descriptor (the 2 bytes shown in the previous section) prevents successful enumeration.

My own HID report descriptor

So I tried designing my own HID report descriptor using the USB-IF's "HID DT (descriptor tool)", like this:

__ALIGN_BEGIN static uint8_t CUSTOM_HID_ReportDesc_FS[USBD_CUSTOM_HID_REPORT_DESC_SIZE] __ALIGN_END =
{
  /* USER CODE BEGIN 0 */
  0x06, 0x00, 0xFF,//USAGE_PAGE (Vendor Defined Page 1)       // 3 B
  0x09, 0x00,      //USAGE (Undefined)                        // 5 B
  0xA1, 0x01,      //COLLECTION (Application)                 // 7 B
  0x75, 0x08,      //  REPORT_SIZE (8)                        // 9 B
  0x95, 0x01,      //  REPORT_COUNT (1)                       // 11B
  0x92, 0xA3, 0x01,//  OUTPUT (Cnst, Var, Abs, NPrf, Vol, Buf)// 14B
  /* USER CODE END 0 */
  0xC0    /*     END_COLLECTION              */

}

CubeMX unfortunately does not bracket the definition of USBD_CUSTOM_HID_REPORT_DESC_SIZE in "USER CODE" markers so that I have to keep changing the USBD_CUSTOM_HID_REPORT_DESC_SIZE every time I generate the code.  With this descriptor, the HID device enumerates, as you can see in the Device Manager --> HID view:

Let's see if I can talk to the device from the development PC.  But first, a little detour about USB suspend, because I noticed that the USB port gets powered off immediately after enumeration--I think that's how it is supposed to be.  Strangely, the keep alive messages (SYNC) do not cease on the wire?!

Bus powered device

In usbd_conf.h, the CubeMX hard codes the self powered setting, just like it hard codes the custom HID report description size.

#define USBD_SELF_POWERED     1
#define USBD_CUSTOM_HID_REPORT_DESC_SIZE 2 //should be 15; see above

Both hard-coded settings are inappropriate for me, and the fact that I cannot override them is annoying.  Nevertheless, let's fix them both

USB SUSPEND

After the initial enumeration, there is no activity on the bus, so the device must enter SUSPEND state (after 3 ms without a SYNC).  How can I tell whether the ST USB middleware is entering SUSPEND?  When I search for "SUSPEND" in the CubeMX generated code, I found a function USB_LL_Suspend() that informs the USB library that the core is entering the suspend mode.  This function is called right before the STM32 is put into stop mode, as you can see here:

void HAL_PCD_SuspendCallback(PCD_HandleTypeDef *hpcd)
{
  /* Inform USB library that core enters in suspend Mode */
  USBD_LL_Suspend(hpcd->pData);
  /*Enter in STOP mode */
  /* USER CODE BEGIN 2 */
  if (hpcd->Init.low_power_enable)
  {
    /* Set SLEEPDEEP bit and SleepOnExit of Cortex System Control Register */
    SCB->SCR |= (uint32_t)((uint32_t)(SCB_SCR_SLEEPDEEP_Msk | SCB_SCR_SLEEPONEXIT_Msk));
  }

  /* USER CODE END 2 */
}

Unfortunately, CubeMX hard codes low_power_enable to 0 in USBD_LL_Init() as you can see here:

  hpcd_USB_FS.Init.low_power_enable = DISABLE;

So I will have to  a modified version of usbd_conf.c USBD_LL_Init() if I want to put the uC to deep sleep, but note that the CubeMX code does NOT turn off the power domains before going to sleep, as shown in the HAL_PWR_EnterSTOPMode(PWR_LOWPOWERREGULATOR_ON, PWR_STOPENTRY_WFI) I currently use:

  tmpreg = PWR->CR;
 
  /* Clear PDDS and LPDS bits */
  tmpreg &= (uint32_t)~(PWR_CR_PDDS | PWR_CR_LPDS);

  /* Set LPDS bit according to Regulator value */
  tmpreg |= Regulator;


But I have a suspicion that the suspend callback is not even getting called.

Windows app to test drive the bus-powered custom HID device

In USB Complete, 4th Edition, I did not understand why Jan Alexson talked about the managed and unmanaged functions--until I realized that MSFT does not offer .NET Windows USB API.  Of course, someone would have already made a .NET library to access the Windows HID API and I can just use it.  I unzipped csharp-usb-hid-driver (GPL3 license), to find the project USBHIDDRIVER in its own folder.  I created my own C# console application project (named WinCustomHID, which also creates a solution WinCustomHID.sln) and added USBHIDDRIVER as another project in my own solution (I was forced to upgrade the USBHIDDRIVER project).  My own project will need a reference to the USBHIDDRIVER project (right click on the project --> Add --> Reference --> Projects --> USBHIDDRIVER).

The usage is simple: create an interface to the device, connect, and start writing, as shown in this example:

using USBHIDDRIVER;
namespace WinCustomHID
{
    class Program
    {
        static void Main(string[] args)
        {
            const string vid = "vid_0483", pid = "pid_5750";
            USBInterface usb = new USBInterface(vid, pid);
            if (!usb.Connect()) {
                Console.WriteLine("Could not connect to {}/{}", vid, pid);
            }
            byte[] command = { 0x42 };
            usb.write(command);
            Console.WriteLine("Done");

            // Have to comment out the usbThread in the lib to avoid crash!
            usb.Disconnect();
        }
    }
}


The documentation says that write() can handle up to 64 bytes, but I found that strange, given that my HID report descriptor explicitly stated that it can only handle 1 byte.  When I browsed the code, I found that "64 byte" was hard-coded--maybe because that is the maximum size of a HID report.

Writing to a custom HID on Android

The device, running the SAME FW, is NOT enumerating on Android.  But MCP2210 does enumerate to Android, so the problem must be in either my device or the FW...

Waking up the host

In USB Complete, 4th Edition, the only clue on how to remote wakeup the host from a device I could find was in Resuming Communications section:
The device ... indicates ... in ... bmAttributes.  The host enables remote wakeup by sending a Set Port Feature(DEVICE_REMOTE_WAKEUP) request to the hub port that is the device's link partner.  A suspended device with remote wakeup enabled can request to resume communications by driving the upstream bus in the Resume state for 1-15 ms.
To "drive the upstream bus" (HW action), I need to follow the  STM32F0 reference manual's USB chapter:
Resume sequence can be started by setting the RESUME bit in the USB_CNTR register to ‘1 and resetting it to 0 after an interval between 1ms and 15ms (this interval can be timed using ESOF interrupts, occurring with a 1ms period when the system clock is running at nominal frequency).
The FW will need to set the USB_CNTR_RESUME bit in hpcd->Instance->CNTR = wInterrupt_Mask after waking up from EXTI.

Jun 9, 2016

How to make a HW without a FW engineer

When I was in biotech, I had interesting experiences working with scientists--biologists in particular.  Just as I will never properly understand the issues and techniques of biology, biologists do not understand the low level SW stack--what makes the instruments they use work.  It's not a matter of intellect or willingness to study; working with the Python scripts they are willing to write and debug dispelled me of any such notion.  But the low level operation of electronic HW requires years of investments that makes it cost prohibitive for all but the most determined scientists to create a reliably working instrument.  Because the scientists are comfortable working with high level scripting language, what they would really like is to control electronics from scripts--and to some degree, they can--using HW with USB interfaces and Python interfaces (as I described how to do in a previous blog entry).  Motion controllers and cameras especially have made lots of progress in this regard.

But if you have a HW without a USB interface feature, you often had to get a FW engineer to control it from a micro-controller.  But if you are a scientist with some ability to work in the .NET environment, you can still regain control with a USB-to-SPI or USB-to-I2C bridge.  For example, MCP2210 shows up as an HID USB device, and you can control it by issuing USB HID "Reports" in the format described in the MCP2210 datasheet.  For example, let's say you need to issue 0x7B7FFF80 to an IC (e.g. humidity sensor).  On the wire, the SPI pins should show this kind of waveform:

With freely downloadable SPI Terminal example application from Microchip (below), you can control the majority of aspects of SPI communication (MCP2210 start to data, data to stop, and byte to byte delays seem rather large and I could not bring it down to lower than shown above).
Microchip even give you a command-line application (CLI), through which you can drive an SPI enabled IC from a Python script with subprocess.call() API.

You can use the MCP2210DLL-M.dll assembly from any .NET language.  The above example app, for example, is written in Visual Basic.  Observe (part of) the code that run when you click the "Transfer SPI Data" button:

iResult = UsbSpi.Functions.TxferSpiData(TxData, RxData)

This API exposes the fact that a master and slave exchanges data in an SPI transaction.  But if you are willing to read the HW datasheet and map it to what your program needs to send and receive, you can control your HW directly from a high level script.

IronPython project to control the MCP2210

On the .NET platform, IronPython is a proven method to access .NET assemblies.  After installing the latest stable IronPython (2.7.4), I also installed the VSTP (Visual Studio Tools for Python) version 2.2.2.  It let me create an "IronPython Application" project (I called it Test1), which is then pre-populated with Test1.py.  VSTP eases development pain; I could set breakpoints right away and examine all variables.  When I used python in a hosted IronPython environment (a WPF app hosts the Python shell), debugging was the biggest pain.  Debugging a python shell script was easy; debugging other IronPython project types (WPF GUI for example) is probably also pleasant.

I copied the MCP2210 DLL into the project folder, and Solution Explorer window --> right-clicked on Test1 project --> Add reference --> Browse, to have Visual Studio auto-discover the DLL just copied.
Then you can see the top level namespace of the assembly.

This script just checks the connected status of the device

import sys, clr
clr.AddReference("MCP2210DLL-M")
import MCP2210 # from MCP2210 import DevIO as UsbSpi
   
def main():
    print("MCP2210 test ######################")
    #print(dir(UsbSpi))

    VID = 0x4D8; PID = 0xDE  # MCP2210 USB ID
    UsbSpi = MCP2210.DevIO(VID, PID)
    connected = UsbSpi.Settings.GetConnectionStatus()
    print("Connected = %d" % (connected,))
    return 0

if __name__ == "__main__":
    sys.exit(main())

Jun 5, 2016

STM32L476 based USB audio device

WARNING: WIP; incomplete

Modern audio devices have a lot of intellectual properties in them.  I want to investigate creating an algorithmic device (an embedded device that runs non-trivial algorithms) that will interact with a mobile phone.  I discovered that creating a Lightning device is onerous than making a USB device to connect to an Android phone, so that is the route I will take in this blog entry.

The big micro-controller vendors like ST all have USB capable product lines, and provide some examples and library to ease the steep learning curve for USB.  Since joining Jawbone, I have been learning about STM32 uCs, so I will stick to the ARM Cortex M4 line of STM32 offerings.  I believe that all new algorithmic projects should start with a floating point capable platform.  I especially like the STM32L4 because it is still a low-power uC.  I downloaded the STM32Cube FW examples and SDK for the L4 line, and found a few USB device application FW examples for the STM32L476G eval board--such as the HID_Standalone/ project.

I already have a nucleo-l476rg board with STM32L476RG uC, which supports USB FS (full-speed: 12 Mbps).  I propose to turn this board into a USB stereo input and output audio device.  The USB FS bandwidth limitation limits the sample rate to 48 kHz (as a comparison, CD rate is 44.1 kHz, and high quality audio is 96 kHz or 192 kHz).  The USB FS bandwidth is considerably greater than low power wireless radio bandwidth (e.g. ~1 Mbps for BLE, and 596 Kbps for NFMI).

HW to turn nucleo-l476 eval board into a USB device

Unlike its more expensive cousin STM32L476G-eval board, the nucleo board does not have a USB socket, or the nice EMI/ESD filter, which is shunted on the DP/DM the STM32L476G-eval board.  But at least all the USB functions are exposed, as shown below.
  • D+ and D- are on PA12 and PA11.
  • When in device mode, the VBUS (PA9) can be connected to the Vbus (5 V) to detect the Vbus (with an on-chip voltage comparator), or a battery charge detector (how?).  This may be useful for a battery powered device that is USB charged, but I am only trying to make a USB device that is entirely powered by (the mobile phone's) USB.  PA9 will be deasserted when the transceiver is active, so one might be able to drive some indication of the USB activity.
  • The uC can assert SOF pin (PA8) at the start of a frame--for synchronizing with an external chip (in a high performance application such as audio).
  • U5V pin is the 5 V USB bus voltage that supplies the power to the whole board when it is connected to the USB host, as you can see in the schematic of the STM32L476G-eval board, showing a direct connection from the USB bus VCC to the U5V pin.
USB transceivers are powered from a separate VDDUSB pin (also called VUSB below).  According to the STM32L476 datasheet:
VDDUSB = 3.0 to 3.6 V: external independent power supply for USB transceivers. The VDDUSB voltage level is independent from the VDD voltage.  After reset, the USB features supplied by VDDUSB are logically and electrically isolated and therefore are not available. The isolation must be removed before using the USB OTG peripheral, by setting the USV bit in the PWR_CR2 register, once the VDDUSB supply is present.
To repeat, VDDUSB is a dedicated pin on the uC, expected to be ~3.3V (NOT the 5V VBUS straight from the USB port!).  On the Nucleo64 boards (Nucleo boards for the LQFN64 packages), VDDUSD comes shorted to VDD over the solder bridge SB31, as shown below
I can therefore cut SB31 and connect VDDUSB to my own USB header if I have a battery powered USB device.

BUT IF I want to power the device from USB, I have to generate VDD from VBUS, as Synopsis recommends in the STM32L4 reference manual, USB on-the-go full-speed (OTG_FS) chapter.
For now, I will just power my L476RG board from the development PC's USB bus, through the 5 V to 3V3 LDO on the board, shown below:

USB audio example generated by STM32CubeMX

ST's CubeMX is a graphical code generator for the ST uC.  In it, I assigned pin functions and auto-configured the clocks for the desired feature sets.
In addition to the low level code (HAL, CMSIS), the CubeMX can (since I chose USB feature for pins PA11/12) generate stub code for several USB class devices, as you can see in the pull-down list in the CubMX's Configuration tab view, as shown below:
I selected audio device class, and configured the project setting like this
To learn which files are generated, I selected "Copy only the necessary library files" in the "Code Generator" tab, and generated code (menu --> Project --> Generate Code) and also a report for the generated code (right below the generate code option).  CubeMX outputs files in the SAME folder as the CubeMX project, as you can see below.
When examining the report, I noticed a few "eyebrow raisers":
  • UART2
    • Word length should be 8, but set to 7 currently.
    • Baud rate was NOT selectable in CubeMX, as you can see here
  • USB
    • Endpoint 0 max packet size: 64 B, but CubeMX didn't offer this option, as you can see here.
    • VBUS sensing: I had it disabled (see above), but report says "Enabled"
    • "Enable internal IP DMA" turned off, but CubeMX didn't offer this option
    • Low power, link power management: disabled
  • USB audio device class middleware
    • USBD_LPM_ENABLED: true; conflicts with above choice for the device
    • USBD_AUDIO_FREQ:: 22100.  I need it to be at least 44100 Hz!
    • VID will be 1155
    • PID will be 22336
    • PRODUCT_STRING will be STM32_Audio_Class
    • CONFIGURATION_STRING: AUDIO Config
    • INTERFACE_STRING: AUDIO Interface
  • NVIC
    • Interrupt for USART2 disabled
    • USB OTG FS global interrupt same priority as the systick, because I left the priorities unassigned in Configuration --> NVIC, as you can see here.

Importing the generated source into the GNUARMeclipse "Hello world" plugin

The example uses the ST HAL library, which may be more "help" than I would typically want, but I'll just follow along for now.  The example comes in several project flavors: IAR EWARM, Keil uVision, Atollic TrueStudio, and SW4STM3.  I have a free copy of uVision, and the project builds cleanly; furthermore, since the .text + .data is only about 20 KB (< 32 KB), I will be able to debug it on the target!  The only problem is that uVision's code browse feature is horrible (when compared to Eclipse CDT).  Since I prefer Eclipse CDT and gnu toolchain, I decided to create a new gnuarm Eclipse C project in another folder and just import the generated files.  Since gnuarmeclipse plugin does NOT support STM32L4, I fell back to the Cortex-M project template, as shown below:
In the next window, the C Project generator wizard asks for the chip/project specific settings shown below.
The ROM and RAM size are baked into the chip, but the system clock speed configurable (even graphically, in CubeMX), as shown below.
In the project folder, I accepted the defaults, including the "newlib" C runtime.  The CMSIS name should match the chip family, as shown below.
In the FINAL window, Eclipse CDT detected the GNU arm toolchain (arm-none-eabi-gcc) I installed prior to this project, as you can see below:
The GNUARMeclipse plugin then dutifully generates code for a "Hello world" in the default folders I accepted, but I some of these files (highlighted below) conflict with the CubeMX generated source files, and must be deleted.
The ldscripts/mem.ld also has a mistake for the on-chip flash address start address, so I fixed it to the correct value (the same on all STM32Lxxx lines), as shown below:

MEMORY
{
  FLASH (rx) : ORIGIN = 0x08000000, LENGTH = 1024K
  RAM (xrw) : ORIGIN = 0x20000000, LENGTH = 96K


So far, the Eclipse project is missing the files specific to the pins I selected in CubeMX.  To overlay the CubeMX generated project on top of my Eclipse project, headers from the <CubeMX gen>/Inc/ folder to the include/ folder.  When drag-and-dropping into the Eclipse Project Explorer, I got an option to link the files instead of copying, as you can see here.
Since I might modify the files, I chose "Copy", but "Link" is an attractive option if I am changing the board configuration later.  In total, these are the folders I copied from <CubeMX gen> to the Eclipse project:
  • Inc/* --> include/
  • Src/* --> src/
  • Drivers/STM32L4xx_HAL_Driver/Inc/* --> system/include/stm32l4xx/
  • Drivers/STM32L4xx_HAL_Driver/Src/* --> system/src/stm32l4xx/
  • Drivers/CMSIS/Device/ST/STM32L4xx/Include/* --> system/include/cmsis/.  Even though there are identically named files in there, I choose to use the CMSIS files that ST has tested against.
  • Drivers/CMSIS/Device/ST/STM32L4xx/Source/Templates/system_stm32l4xx.c --> system/src/cmsis/
  • Drivers/CMSIS/Device/ST/STM32L4xx/Source/Templates/gcc/startup_stm32l4xx.s --> system/src/cmsis/startup_stm32l4xx.S.  The extension change is required because Eclipse CDT expects assembly file extension to be ".S".
  • Middlewares/ST/STM32_USB_Device_Library/Core/Inc/* --> include
  • Middlewares/ST/STM32_USB_Device_Library/Core/Src/* --> src
  • Middlewares/ST/STM32_USB_Device_Library/Class/AUDIO/Inc/* --> include
  • Middlewares/ST/STM32_USB_Device_Library/Class/AUDIO/Src/* --> src
The USB middleware files are necessary only because I want to use the ST's USB middleware.  Initially, I tried to copy the folder Middlewares/ST/STM32_USB_Device_Library/ to the project root, but the GNUARMeclipse "Hello world" template would not generate a recursive build rule for the STM32_USB_Device_Library folder I copied.  Figuring I will switch to a Makefile in the end, I just worked around by copying the sources individually to existing include/ and src/ folders.

The project needs to define the chip definition to the generated source, in the project properties --> C/C++ Build --> Settings, as you can see below.  I supplied STM32L476xx for the gas and gcc preprocessors (for both the Debug and Release configurations), but didn't do it for the C++ preprocessor (because I don't use C++ in this project!).
With these changes, the project builds cleanly (but with some warnings).

Understanding the generated USB example; first pass: browsing the source

Right after HAL_Init() and SystemClock_Config(), the generated main() calls MX_USB_DEVICE_INIT().
  1. USBD_Init(handle, &descriptor, DEVICE_FS)
  2. USBD_RegisterClass(handle, &USBD_AUDIO)
  3. USBD_AUDIO_RegisterInterface(handle, USBD_AUDIO_fileops)
  4. if BCD (battery charging detection) is NOT used, start the device(handle)
After the init, the FW just spins in a busy loop, so EVERYTHING else must happen in interrupts in the vector table--also generated by the CubeMX (startup_stm32l476xx.s I copied above).  I found the OTG_FS_IRQHandler in the vector table; the IRQ number is 67 (OTG_FS_IRQn in IRQn_Type in stm32l476xx.h).  CubeMX generated the ISR in stm32l4xx_it.c.  In the project thus far, only 2 interrupts are necessary: SysTick (used by the HAL) and USB.  The USB ISR simply dispatches into the HAL handler, as you can see here:

void OTG_FS_IRQHandler(void)
{
  /* USER CODE BEGIN OTG_FS_IRQn 0 */

  /* USER CODE END OTG_FS_IRQn 0 */
  HAL_PCD_IRQHandler(&hpcd_USB_OTG_FS);
  /* USER CODE BEGIN OTG_FS_IRQn 1 */

  /* USER CODE END OTG_FS_IRQn 1 */
}

I will be on a lookout for where HAL_NVIC_EnableIRQ(OTG_FS_IRQn) is called in the generated code.  Also, in the STM32L4x6 reference manual, I saw that EXTI (used to wake up the uC) line 17 is connected to the OTG_FS wakeup event.  The different OTG interrupts are listed in the OTG_GINTMSK.
  • In device mode, there is an "all endpoint" interrupt mask register (OTG_DAINTMSK)
    • But each endpoints have a dedicated interrupt mask register (OTG_DIEPMSK for IN and OTG_DOEPMSK).
    • There is also a FIFO empty interrupt (OTG_DIEPEMPMSK)
  • In host mode, there is an "all channels" interrupt mask register (OTG_HAINTMSK) and per-channel interrupt mask (OTG_HCINTMSKx)
I will come back to interrupt handling after looking at the init code.

USBD_Handle

As you can see, the USB device handle is the "object" responsible for all USB device operations.  It keeps many USB details and up to 15 endpoints in addition to the EP0, which is the control endpoint required by the USB spec.

USBD_Init(handle, &FS_Desc, DEVICE_FS)

The USB descriptors passed to USBD_Init is actually a virtual interface to not just the device descriptor, but also many other descriptors, including:
  • language ID
  • manufacturer string
  • product string
  • serial string
  • config string
  • interface string
  • user BOS (?)
DEVICE_FS--the last argument to USBD_Init()--was generated by CubeMX (usbd_conf.h), along with other defines I might want to change later:

#define USBD_MAX_NUM_INTERFACES     1
#define USBD_MAX_NUM_CONFIGURATION     1
#define USBD_MAX_STR_DESC_SIZ     512
#define USBD_SUPPORT_USER_STRING     0
#define USBD_DEBUG_LEVEL     0
#define USBD_LPM_ENABLED     1
#define USBD_SELF_POWERED     1
#define USBD_AUDIO_FREQ    
22100
#define DEVICE_FS   0 /* #define for FS and HS identification */
USBD_Init() calls USBD_LL_Init(), which (strangely) configures some PCD (peripheral controller something?) properties contrarily to the above auto-generated code.

  hpcd_USB_OTG_FS.Init.dev_endpoints = 7; //Q: why 7?
  hpcd_USB_OTG_FS.Init.speed = PCD_SPEED_FULL;
  hpcd_USB_OTG_FS.Init.ep0_mps = DEP0CTL_MPS_64;
  hpcd_USB_OTG_FS.Init.phy_itface = PCD_PHY_EMBEDDED;
  hpcd_USB_OTG_FS.Init.Sof_enable = DISABLE;
  hpcd_USB_OTG_FS.Init.low_power_enable = DISABLE;
  hpcd_USB_OTG_FS.Init.lpm_enable = DISABLE;
  hpcd_USB_OTG_FS.Init.battery_charging_enable = DISABLE;
  hpcd_USB_OTG_FS.Init.vbus_sensing_enable = ENABLE;


Recall that this structure is the same one that is passed to the PCD interrupt handler from the OTG ISR.  It is also passed into HAL_PCD_Init(), which:
  • HAL_PCD_MspInit() if PCD state is RESET
    • Configures PA11/12 for alternate function (see the board pinout at the very beginning of the entry)
    • __USB_OTG_FS_CLK_ENABLE().  Recall that the 48 MHz USB clock is isolated from the rest of the system, and can even be generated from the 32 KHz oscillator.
    • HAL_PWREx_EnableVddUSB(), which just sets the PWR_CR2.USV bit to power up the USB transceivers according to the STM32L4x6 reference manual, Power control (PWR) chapter, Independent USB transceivers supply.
    • Enable OTG_FS_IRQn (priority specified in CubeMX)
  • __HAL_PCD_DISABLE(): disable all USB interrupts (Q: what reenables it?)
  • USB_CoreInit()
    • GUSBCFG |= USB_OTG_GUSBCFG_PHYSEL unnecessary since ref man says this bit is always 1?
    • USB_CoreReset(): required after PHY select
    • GCCFG = USB_OTG_GCCFG_PWRDWN: release transceiver power down
    • GUSBCFG |= USB_OTG_GUSBCFG_SRPCAP: enable allow SRP
  • USB_SetCurrentMode(..., USB_OTG_DEVICE_MODE)
    • GUSBCFG |= USB_OTG_GUSBCFG_FDMOD: force device mode (ignore OTG ID pin)
    • Delay 50 ms
  • Initializes IN and OUT endpoints (to control type)
  • USB_DevInit()
    • GCCFG |= USB_OTG_GCCFG_VBDEN: Vbus detect enable
    • USBx_DEVICE->DCFG |= DCFG_FRAME_INTERVAL_80: interrupt at 80 % of the frame interval (e.g. to check if all isochronous traffic for that frame is complete)
    • Set PHY to full speed (vs. low speed)
    • Flush all FIFOs (TX and RX)
    • Reset all IN and OUT endpoint registers
    • Clear all USB device interrupts
    • DIEPMSK &= ~(USB_OTG_DIEPMSK_TXFURM)
    • Configure DMA threshold
    • Disable and clear all interrupts
    • Enable interrupts for device mode only:
      • USBSUSPM, USBRST, ENUMDNEM, IEPINT, OEPINT, PXFRM_IISOIXFRM, PXFRM_IISOOXFRM, WUIM
      • SOFM if SOF enabled
      • SRQIM | OTGINT if Vbus sensing enabled
  • PCD state = READY
  • HAL_PCDEx_ActiveLPM() if LPM enabled
  • HAL_PCDEx_ActivateBCD(0 if battery charging enabled
  • USB_DevDisconnect(): asserts DCTL.SDIS bin to "soft disconnect" the USB
Finally, USBD_LL_Init() sets the size of 1 RX and 2 TX FIFOs:

  HAL_PCD_SetRxFiFo(&hpcd_USB_OTG_FS, 0x80);
  HAL_PCD_SetTxFiFo(&hpcd_USB_OTG_FS, 0, 0x40);
  HAL_PCD_SetTxFiFo(&hpcd_USB_OTG_FS, 1, 0x80);

While each TX endpoints get its own FIFO, there is only 1 RX FIFO--which makes sense since we have to demux the incoming packet.

USBD_RegisterClass(handle, &USB_AUDIO)
As a protocol defined class, the audio class has the following implementations to respond to the USB stack:

USBD_ClassTypeDef  USBD_AUDIO =
{
  USBD_AUDIO_Init,
  USBD_AUDIO_DeInit,
  USBD_AUDIO_Setup,
  USBD_AUDIO_EP0_TxReady, 
  USBD_AUDIO_EP0_RxReady,
  USBD_AUDIO_DataIn,
  USBD_AUDIO_DataOut,
  USBD_AUDIO_SOF,
  USBD_AUDIO_IsoINIncomplete,
  USBD_AUDIO_IsoOutIncomplete,     
  USBD_AUDIO_GetCfgDesc,
  USBD_AUDIO_GetCfgDesc,
  USBD_AUDIO_GetCfgDesc,
  USBD_AUDIO_GetDeviceQualifierDesc,
};

Class registration to the ST's USB middleware is therefore just registering the above interface to the USB device (sets the pClass interface).

USBD_AUDIO_RegisterInterface(handle, &USBD_AUDIO_fops_FS)

The USB spec requires only the control endpoint for all audio class devices, and the USBD_AUDIO_fops_FS supplies that implementation:

USBD_AUDIO_ItfTypeDef USBD_AUDIO_fops_FS =
{
  AUDIO_Init_FS,
  AUDIO_DeInit_FS,
  AUDIO_AudioCmd_FS,
  AUDIO_VolumeCtl_FS,
  AUDIO_MuteCtl_FS,
  AUDIO_PeriodicTC_FS,
  AUDIO_GetState_FS,
};


The USB device keeps the pointer to the above structure in its pUserData field.

USBD_Start(handle)

Starting the USB device consists of enabling the pull-up/down by deasserting the OTG_DCTRL.SDIS (soft disconnect) bit, and THEN waiting for 3 ms (with HAL_Delay--which assumes 1000 Hz systick rate).

Since I disabled battery charging (from USB 5V) for this device, MX_USB_DEVICE_Init() will call USBD_Start().

HAL_PCD_IRQHandler(&hpcd_USB_OTG_FS)

Apparently, it is possible for OTG HW to fire an interrupt that I did not enable (race condition in disabling interrupt, or protecting against mistake in the higher layer when disabling interrupt with interrupt already pended?).  So the handler checks the current interrupt status against the enabled interrupt mask in __HAL_PCD_IS_INVALID_INTERRUPT(hpcd).

The OTG can only be in host or device mode, and if there is a mixup, the MMIS (mode mismatch) interrupt will fire.

    if(__HAL_PCD_GET_FLAG(hpcd, USB_OTG_GINTSTS_MMIS))
      __HAL_PCD_CLEAR_FLAG(hpcd, USB_OTG_GINTSTS_MMIS);


Hiding this problem from the application and simply quenching the interrupt looks problematic...

A logical way to study this code might be the USBRST interrupt.

If the USB_OTG_GINTSTS_OEPINT bit is set, then the upper 16-bits (bottom 16-bit are for the IN endpoints) of USBx_DEVICE->DAINT (all endpoint interrupt register) is read.  EP0 is treated specially (because it is a control endpoint), but the interrupt status is still at the OTG_DOEPINTx register.

If the programmed transfer is complete, the USB_OTG_DOEPINT_XFRC bit is set.  To clear a bit, simply write '1' for that bit (other bits are apparently unaffected).  The 0x8000 bit in the DOEPINTx register apparently means "packet received", If so, and DMA is enabled, the EP's xfer_count and xfer_buff is incremented.  On setup phase done interrupt (STUP), the handler calls HAL_PCD_SetupStageCallback()--which the application should implement if it wants to handle the setup complete event.  Strangely, the CubeMX generated handler only handles EP0 OUT interrupt.  The IN endpoint handling is equally mysterious.

Trying out the example

TODO

Android app to interact with the USB audio device

For Android Studio to control my phone as a development target, adb is necessary.  Running adb over USB is straight-forward if USB debugging is enabled on the phone.  But to write an application that uses USB, I would have to run adb over TCP--first by connecting to the phone over USB and running the adb command like this example:

C:\Users\Henry\AppData\Local\Android\sdk\platform-tools\adb tcpip 5555
* daemon not running. starting it now on port 5037 *
* daemon started successfully *
restarting in TCP mode port: 5555


THEN with the phone disconnected, connect over TCP:

C:\Users\Henry\AppData\Local\Android\sdk\platform-tools\adb connect 192.168.43.1
connected to 192.168.43.1:5555

The phone's address is variable of course.  Above address is my phone's IP with the Mobile Hotspot enabled.

Appendix: Play around with the Plantronics headset

I had to look for my headset.  I used to use USBDeview to view all enumerated USB devices, but that doesn't seem to work on Windows 10 any more, so I just sucked it up and installed Windows SDK--just to pick up the Windows Debugging Tools package containing usbview.exe.  I found the program in this folder after the install: C:\Program Files (x86)\Windows Kits\10\Debuggers\x64.

This is the device information from usbview:

bLength:                           0x12
bDescriptorType:                   0x01
bcdUSB:                          0x0200
bDeviceClass:                      0x00  -> This is an Interface Class Defined Device
bDeviceSubClass:                   0x00
bDeviceProtocol:                   0x00
bMaxPacketSize0:                   0x40 = (64) Bytes
idVendor:                        0x047F = Plantronics, Inc.
idProduct:                       0xC008
bcdDevice:                       0x0132
iManufacturer:                     0x01
     English (United States)  "Plantronics"
iProduct:                          0x02
     English (United States)  "Plantronics .Audio 655 DSP"
iSerialNumber:                     0x00
bNumConfigurations:                0x01


When I connected the headset to my phone (via an adapter), Spotify app played my playlist on it right away.

Appendix: Android documentation

The methods, parameter types and units exposed by the Equalizer implementation are directly mapping those defined by the OpenSL ES 1.0.1 Specification (http://www.khronos.org/opensles/) for the SLEqualizerItf interface. Please refer to this specification for more details. To attach the Equalizer to a particular AudioTrack or MediaPlayer, specify the audio session ID of this AudioTrack or MediaPlayer when constructing the Equalizer.
NOTE: attaching an Equalizer to the global audio output mix by use of session 0 is deprecated.
Creating a Visualizer on the output mix (audio session 0) requires permission MODIFY_AUDIO_SETTINGS

You can play back the audio data only to the standard output device. Currently, that is the mobile device speaker or a Bluetooth headset. You cannot play sound files in the conversation audio during a call.

https://developer.android.com/training/managing-audio/audio-output.html
You can query the AudioManager to determine if the audio is currently being routed to the device speaker, wired headset, or attached Bluetooth device.

A2DP (advanced audio distribution profile), AKA Bluetooth Audio Streaming

An Equalizer is used to alter the frequency response of a particular music source or of the main output mix.

Android audio terminology page.

AudioEffect is the base class for controlling audio effects provided by the android audio framework. Applications should not use the AudioEffect class directly but one of its derived classes to control specific effects:

Appendix: notes taken while reading Unboxing Android USB

Android USB device (vs. host) stack
Android USB host stack is just the mainline Linux kernel USB host stack--but only as a USB OTG host (the same as USB embedded host?), which supports only the TPL (targeted peripheral list).  The stack is different.
libusbhost is a thinner version of the Linux libusb adopted to Android.

android.hardware.usb package

android.hardware.usb.host package

  • UsbDevice class: device connected to Android that is in USB host mode.
  • UsbManager: state information.  Provide permission to the USB device and state information intent.
  • UsbDeviceConnection: send/receive data to USB device
  • UsbInterface: expose device functions
  • UsbEndpoint: no support for isochronous endpoint?
  • UsbRequest: USB packet to read/write to device
USB settings manager

Intent to discover USB device: Intent.ACTION_USB_DEVICE_ATTACHED/DETACHED

AOA (Android open accessory) protocol

An accessory like a docking station can power the phone and play the accessory role.

USB audio (USB-IF audio device class, release 1.0)

USB host audio (which can use USB headset) uses usb-core Linux kernel module.

USB device audio: receive audio stream from Android and play back to user.
An audio device exposes its functionality to a host through its interfaces (interfaceAudio streaming interface, MIDI streaming interface), as shown here:
Audio function consists of units and input/output terminals.
  • MU, mixer unit
  • SU, selector unit
  • FU, feature unit
  • PU, processing unit
  • XU, extension unit
USB audio accessory descriptor tree
USB audio transport framework register to ALSA (advanced Linux sound architecture), the Linux sound card driver.

Audio output device code a slave USB device (Android is the host): AudioManager.DEVICE_OUT_USB_DEVICE = AudioSystem.DEVICE_OUT_USB_DEVICE.  Discover with Intent.ACTION_USB_AUDIO_DEVICE_PLUG.


USB_AUDIO_DEVICE_PLUG intent is defined but not generated in Jelly Bean.

If you can broadcast the USB_AUDIO_DEVICE_PLUG intent with the sound card details to the Android audio framwork, Android will play audio over the USB headset.
  1. Connect a USB headset.  Check with lsusb and "cat /proc/asound/cards"
  2. Broadcast "am broadcast -a android.intent.action.uSB_AUDIO_DEVICE_PLUG --ei state 1 --ei card 2 --ei device 0"


Debugging Android on OTG

  1. Connect the Android-powered device via USB to your computer.
  2. From your SDK platform-tools/ directory, enter adb tcpip 5555 at the command prompt.
  3. Enter adb connect 10.2.100.14:5555 You should now be connected to the Android- powered device and can issue the usual adb commands like adb logcat.
  4. To set your device to listen on USB again, enter adb usb.